
Introduction
If you love the classic flavor of red velvet cake but crave the fudgy texture of brownies, these Red Velvet Brownies are the perfect treat! They have a deep chocolate flavor, a hint of vanilla, and a vibrant red color, making them an eye-catching dessert for any occasion.
Topped with a cream cheese swirl, a dusting of powdered sugar, or served with ice cream, these brownies are rich, chewy, and completely irresistible. Whether you’re baking for a holiday, Valentine’s Day, a party, or just a sweet craving, this easy homemade red velvet brownie recipe will impress every time!
If you love rich and fudgy brownies, don’t miss these Cookies and Cream Brownies, a perfect mix of Oreos and chocolate!
Why You’ll Love Red Velvet Brownies
1. The Perfect Combination of Brownies and Red Velvet Cake
- These brownies capture the rich, chocolatey taste of brownies while keeping the signature slightly tangy and sweet flavor of red velvet cake.
- Unlike regular brownies, they have a lighter cocoa flavor with a hint of vanilla and butter, creating a unique and balanced taste.
- If you love red velvet desserts but prefer a chewy, fudgy texture over cake, these brownies are the best of both worlds!
2. Super Fudgy and Moist
- The high butter-to-flour ratio keeps these brownies soft and rich.
- Adding brown sugar ensures extra moisture and chewiness.
- They’re dense and fudgy on the inside while slightly crispy on the edges, making every bite deliciously satisfying.
3. Vibrant and Beautiful Appearance
- The deep red color makes these brownies stand out on any dessert table.
- Perfect for holidays like Valentine’s Day, Christmas, and birthdays.
- They look stunning when dusted with powdered sugar or topped with a cream cheese drizzle.
4. Quick and Easy to Make
- This recipe requires simple pantry ingredients—no fancy tools or mixers needed!
- Ready in under 40 minutes from start to finish.
- Uses just one bowl, making cleanup super easy.
5. Perfect for Any Occasion
- These brownies are great for:
- Holiday gatherings (Valentine’s Day, Christmas, Thanksgiving)
- Bake sales and potlucks (they’re always a hit!)
- Dessert platters for family get-togethers
- Everyday sweet cravings (because why not treat yourself?)
6. Customizable with Different Toppings & Add-ins
- Make them even more indulgent by adding:
- White or dark chocolate chips for extra richness.
- Chopped nuts like pecans or walnuts for a crunchy contrast.
- A cream cheese swirl for a classic red velvet flavor.
- A drizzle of white chocolate or caramel sauce for extra decadence.
7. Soft and Chewy, Never Dry!
- Some red velvet desserts can be dry or crumbly, but not these brownies!
- Thanks to the perfect mix of butter, eggs, and a touch of vinegar, they remain moist and chewy for days.
8. Great for Make-Ahead & Freezing
- You can make them ahead and store them for later:
- At room temperature for 3-4 days.
- In the fridge for up to a week.
- In the freezer for up to 3 months (just thaw and enjoy!).
9. Loved by Kids and Adults Alike
- These brownies are a hit with everyone—kids love the chewy texture, and adults enjoy the rich, chocolatey taste.
- They make a fun baking activity for families and a great gift for friends and coworkers.
10. Brings a Bakery-Style Dessert to Your Home
- These brownies taste better than store-bought or bakery versions because they’re made from scratch with real, high-quality ingredients.
- Plus, they fill your kitchen with a sweet, chocolatey aroma while baking—making them even more irresistible!
Looking for another decadent dessert? Try these Cheesecake Lemon Bars for a tangy, sweet treat!
Ingredients for the Red Velvet Brownies
For the Red Velvet Brownies:
- ½ cup unsalted butter, melted
- 1 cup granulated sugar
- ¼ cup brown sugar
- 2 large eggs
- 1 teaspoon vanilla extract
- 1 tablespoon red food coloring (liquid or gel)
- 1 teaspoon white vinegar
- ½ cup all-purpose flour
- ¼ cup unsweetened cocoa powder
- ¼ teaspoon salt
Optional Cream Cheese Swirl:
- 4 ounces cream cheese, softened
- ¼ cup powdered sugar
- 1 egg yolk
- ½ teaspoon vanilla extract
How to Make Red Velvet Brownies
These Red Velvet Brownies come together in a few simple steps. The key is getting the perfect balance of chocolate, vanilla, and that signature red color, while ensuring a moist, fudgy texture. Follow these detailed instructions for the best results!
Step 1: Preheat the Oven & Prepare the Pan
- Preheat your oven to 350°F (175°C).
- A properly heated oven ensures even baking and the right brownie texture.
- Prepare the baking pan:
- Line an 8×8-inch baking pan with parchment paper, leaving some overhang on the sides. This makes it easy to lift the brownies out once baked.
- If you don’t have parchment paper, lightly grease the pan with butter or non-stick spray to prevent sticking.
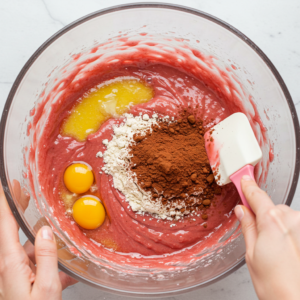
Step 2: Prepare the Brownie Batter
The brownie batter is what gives these treats their signature red velvet taste and texture. Here’s how to make it perfectly:
- Melt the butter:
- In a microwave-safe bowl, melt ½ cup (1 stick) of unsalted butter in 30-second intervals, stirring between each until fully melted.
- Let it cool slightly before adding other ingredients.
- Whisk the sugars and wet ingredients:
- In a large mixing bowl, whisk together:
- Granulated sugar (1 cup)
- Brown sugar (¼ cup) – adds extra moisture and a slight caramel flavor
- Melted butter – helps create a rich, fudgy texture
- Add the eggs, vanilla, and red food coloring:
- Mix in 2 large eggs, one at a time, whisking well after each addition.
- Stir in 1 teaspoon vanilla extract for a sweet, aromatic flavor.
- Add 1 tablespoon of red food coloring (liquid or gel) to get that classic red velvet color.
- Mix in 1 teaspoon of white vinegar—this enhances the red color and tenderizes the brownies.
- Sift in the dry ingredients:
In a separate bowl, sift together:
- ½ cup all-purpose flour – provides structure
- ¼ cup unsweetened cocoa powder – adds mild chocolate flavor
- ¼ teaspoon salt – balances sweetness
- Gently fold the dry ingredients into the wet ingredients:
- Use a spatula to gently fold everything together until just combined.
- Do not overmix, or the brownies may become dense instead of fudgy.
Step 3: Make the Cream Cheese Swirl (Optional, but Recommended!)
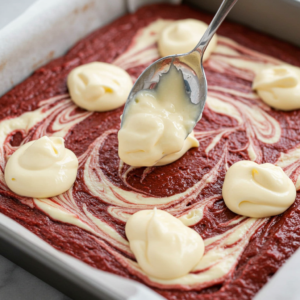
For extra richness, you can add a delicious cream cheese swirl on top:
In a large mixing bowl, whisk together:
- 4 ounces softened cream cheese
- ¼ cup powdered sugar
- 1 egg yolk
- ½ teaspoon vanilla extract
- Dollop spoonfuls of the cream cheese mixture over the brownie batter.
- Use a knife or toothpick to swirl it in, creating a marbled effect.
Step 4: Assemble the Brownies
- Pour the red velvet brownie batter into the prepared pan, spreading it evenly.
- If using the cream cheese swirl, add it now and gently swirl it into the batter.
- For extra chocolate flavor, sprinkle white or dark chocolate chips on top.
Step 5: Bake the Brownies
- Place the pan in the preheated oven and bake for 25-30 minutes, or until:
- A toothpick inserted in the center comes out with a few moist crumbs (not wet batter).
- The edges start pulling away slightly from the pan.
- Let the brownies cool in the pan for at least 10 minutes before transferring to a wire rack.
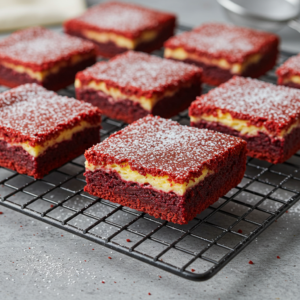
Last Step: Slice & Serve the Red Velvet Brownies
- For clean slices, let the brownies cool completely before cutting.
- Use a sharp knife and wipe it clean between cuts for neat edges.
- Dust with powdered sugar, drizzle with melted chocolate, or serve with ice cream!
Tips for the Best Red Velvet Brownies
Want perfectly fudgy, flavorful, and beautifully vibrant brownies every time? Follow these expert tips!
1. Use the Right Amount of Cocoa Powder
- Red velvet is not a full chocolate dessert—it has a mild cocoa flavor balanced with vanilla.
- Too much cocoa will overpower the red color, so stick to ¼ cup unsweetened cocoa powder for the best balance.
2. Don’t Skip the Vinegar
- Why add vinegar? It helps react with the baking soda in the cocoa, enhancing the red color and keeping the brownies tender.
- You won’t taste the vinegar in the final product, but it makes a big difference!
3. Use Gel Food Coloring for a Vibrant Red Color
- Liquid food coloring works, but gel food coloring is more concentrated and gives a brighter, deeper red without altering the texture.
4. Don’t Overmix the Batter
- Overmixing leads to dense, tough brownies instead of soft and chewy ones.
- Gently fold the dry ingredients into the wet ingredients until just combined.
5. Check for Doneness Early
- Every oven is different, so start checking your brownies around 25 minutes.
- A toothpick should come out with a few moist crumbs—if it’s completely clean, the brownies might be overbaked.
- Undercooked brownies = gooey and delicious
- Overbaked brownies = dry and crumbly
6. Let the Brownies Cool Before Cutting
- Warm brownies are tempting to cut, but letting them cool completely helps them set and keeps them from falling apart.
- For extra clean cuts, refrigerate them for 15-20 minutes before slicing.
7. Add a Frosting or Drizzle for Extra Flavor
- A cream cheese frosting on top makes them even richer!
- Drizzle with white chocolate or caramel sauce for a bakery-style finish.
8. Store Properly for Freshness
- Room temperature: Store in an airtight container for 3-4 days.
- Refrigerator: Store for up to 5 days, especially if using a cream cheese swirl.
- Freezer: Freeze individually wrapped brownies for up to 3 months.
Serving Suggestions for Red Velvet Brownies
These Red Velvet Brownies are delicious on their own, but you can make them even more indulgent with these ideas:
1. Classic Style
- Dust with powdered sugar for a simple but elegant finish.
2. With Ice Cream
- Serve warm brownies with a scoop of vanilla, cookies & cream, or chocolate ice cream.
3. Drizzled with Chocolate
- Melt white or dark chocolate and drizzle over the brownies before serving.
4. Topped with Frosting
- Spread a layer of cream cheese frosting for an extra indulgent treat.
5. As a Brownie Sundae
- Top with whipped cream, chocolate sauce, and sprinkles for a fun dessert.
Pair these brownies with a scoop of ice cream or serve them alongside Pecan Pie Cheesecake for an indulgent dessert combo.
How to Store & Freeze Red Velvet Brownies
Storing at Room Temperature
- Store in an airtight container at room temperature for 3-4 days.
Refrigerating for Longer Freshness
- If using a cream cheese swirl, refrigerate in a sealed container for up to 5 days.
How to Freez the Red Velvet Brownies
- Wrap individual brownies in plastic wrap, then store in a freezer-safe bag.
- Freeze for up to 3 months.
- To serve, let them thaw at room temperature or microwave for 10-15 seconds.
Want to make another make-ahead dessert? Check out this Eclair Dessert, a no-bake, creamy, and delicious option!
FAQs about Red Velvet Brownies
1. Can I use a boxed red velvet cake mix instead?
Yes, but the texture will be more cakey than fudgy. For best results, follow the homemade recipe.
2. Can I make these brownies without food coloring?
Absolutely! They will taste the same but won’t have the classic red velvet color.
3. Can I use Dutch-process cocoa instead of regular cocoa?
It’s best to use natural unsweetened cocoa because it reacts better with the vinegar and baking soda, enhancing the red color.
4. What can I substitute for cream cheese in the swirl?
You can use Greek yogurt or mascarpone cheese, but the flavor will be slightly different.
5. How do I make these brownies extra fudgy?
- Reduce the flour slightly (by about 1 tablespoon).
- Add 1 extra tablespoon of melted butter.
- Slightly underbake them for extra gooeyness.
Final Thoughts on Red Velvet Brownies
These Red Velvet Brownies are the perfect mix of chewy, fudgy, and beautifully vibrant, making them a show-stopping dessert for any occasion. Whether you enjoy them plain, with a swirl of cream cheese, or topped with ice cream, they’re guaranteed to impress family and friends.
Make a batch today and enjoy a decadent twist on classic brownies!