Introduction
Pierogi casserole with kielbasa is a delicious and comforting dish that takes the flavors of traditional pierogies and turns them into a creamy, cheesy, and satisfying baked casserole. This recipe combines tender pasta, smoky kielbasa sausage, buttery onions, and a rich cheese sauce to create a dish that’s perfect for weeknight dinners, potlucks, or family gatherings.
This guide will show you how to make pierogi casserole with kielbasa step by step, along with customization tips, storage advice, and delicious variations to suit your taste.
What Is Pierogi Casserole with Kielbasa?
The Origin of Pierogi Casserole
Pierogies are a traditional Eastern European dumpling, often stuffed with potatoes, cheese, or meat. While classic pierogies are boiled or pan-fried, pierogi casserole simplifies the process by using lasagna noodles, pasta, or frozen pierogies to recreate the flavors in a baked format.
Adding kielbasa (a Polish smoked sausage) gives this dish an extra layer of smoky, savory goodness, making it a hearty and satisfying meal.
Why You’ll Love This Pierogi Casserole with Kielbasa Recipe
- Quick and Easy – No need to make homemade pierogies!
- Cheesy and Creamy – A rich cheese sauce brings everything together.
- Smoky Kielbasa Flavor – The sausage adds depth and heartiness.
- Perfect for Potlucks – A crowd-pleasing dish that’s easy to transport.
- Great for Meal Prep – Stores well and reheats beautifully.
Ingredients for Pierogi Casserole with Kielbasa
The Casserole Base
- 1 lb frozen pierogies (potato and cheese flavor works best)
- 12 oz kielbasa, sliced into rounds
- 1 small onion, thinly sliced
- 1 tablespoon butter
For the Cheese Sauce
- 2 tablespoons butter
- 2 tablespoons all-purpose flour
- 1 ½ cups milk (whole or 2%)
- ½ teaspoon garlic powder
- ½ teaspoon onion powder
- ½ teaspoon salt
- ¼ teaspoon black pepper
- 1 cup shredded cheddar cheese
- ½ cup shredded mozzarella cheese
For Topping
- ½ cup sour cream
- 2 tablespoons chopped green onions or chives
- ½ cup crispy bacon bits (optional)
How to Make Pierogi Casserole with Kielbasa
Making pierogi casserole with kielbasa is simple, quick, and requires minimal prep. The combination of frozen pierogies, smoky kielbasa, caramelized onions, and a creamy cheese sauce ensures that every bite is rich, comforting, and packed with flavor. Follow these step-by-step instructions for the perfect casserole.
Step 1: Prepare the Ingredients
Before you start cooking, it’s important to get all your ingredients prepped and ready.
1. Gather Your Ingredients
- Frozen pierogies – No need to thaw; they will cook in the oven.
- Kielbasa sausage – Slice into ½-inch rounds for even cooking.
- Onion – Thinly sliced for caramelization.
- Cheese – A blend of cheddar and mozzarella works best.
- Butter, milk, and flour – Essential for making the creamy cheese sauce.
2. Preheat the Oven
- Set your oven to 375°F (190°C) to ensure even cooking.
- Grease a 9×13-inch baking dish with butter or nonstick spray.

Step 2: Cook the Kielbasa and Onions
Sautéing the kielbasa and onions enhances their flavor and helps the casserole develop a deeper, richer taste.
- Heat 1 tablespoon of butter in a large skillet over medium heat.
- Add the sliced kielbasa to the pan and cook for 3-4 minutes, stirring occasionally, until it develops a golden-brown crust.
- Add the sliced onions and cook for another 2-3 minutes, until soft and slightly caramelized.
- Remove from heat and set aside.
Pro Tip: Browning the kielbasa before baking adds extra depth of flavor and prevents it from becoming rubbery in the casserole.
Step 3: Make the Creamy Cheese Sauce
A homemade cheese sauce is what takes this casserole from good to absolutely irresistible. The sauce coats the pierogies and kielbasa, keeping everything moist, cheesy, and delicious.
1. Make the Roux (Thickens the Sauce)
- In a medium saucepan, melt 2 tablespoons of butter over medium heat.
- Whisk in 2 tablespoons of all-purpose flour and cook for 1 minute, stirring constantly. This eliminates the raw flour taste.
2. Add Milk and Seasonings
- Slowly pour in 1 ½ cups of milk, whisking continuously to prevent lumps.
- Add the garlic powder, onion powder, salt, and black pepper, and stir.
- Continue cooking for 2-3 minutes, until the sauce thickens slightly.
3. Melt the Cheese
- Remove from heat and stir in 1 cup shredded cheddar cheese and ½ cup mozzarella.
- Mix until the cheese melts completely and the sauce is smooth.
Pro Tip: If the sauce is too thick, add a splash of milk until it reaches a pourable consistency.
Step 4: Assemble the Casserole
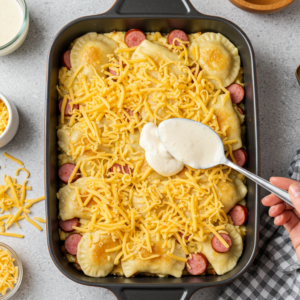
Now that all components are ready, it’s time to layer everything for the perfect balance of flavors.
- Arrange the Frozen Pierogies
- Place the frozen pierogies in a single layer in the greased baking dish.
- If you have extra pierogies, slightly overlap them.
- Add the Kielbasa and Onions
- Evenly distribute the browned kielbasa and onions over the pierogies.
- Make sure each bite has a mix of flavors.
- Pour the Cheese Sauce
- Slowly pour the warm cheese sauce over the pierogies and kielbasa.
- Use a spoon to spread the sauce evenly, ensuring everything is coated.
- Cover and Bake
- Cover the casserole dish loosely with foil.
- Bake at 375°F for 20 minutes.
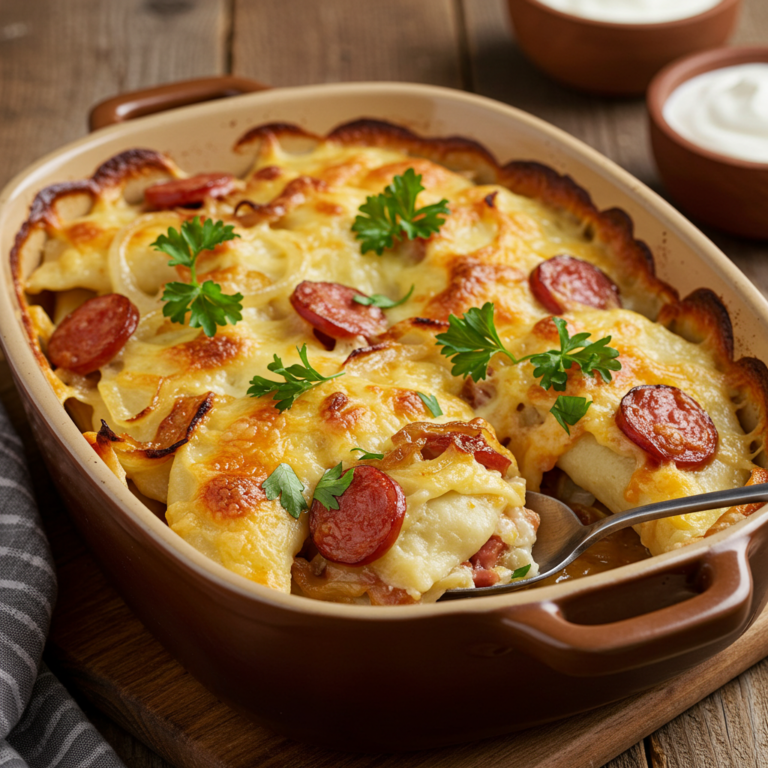
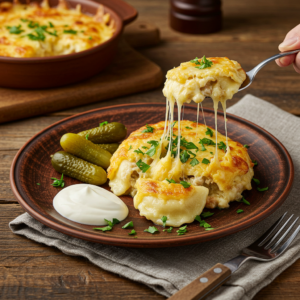
Step 5: Finish and Serve
- Remove the foil and bake for another 10 minutes, or until the top is golden and bubbly.
- Garnish with toppings:
- Sour cream – Adds tangy creaminess.
- Chopped green onions or chives – For a fresh, mild onion flavor.
- Crispy bacon bits (optional) – Adds extra crunch and smoky flavor.
- Let the casserole rest for 5 minutes before serving to allow the flavors to meld.
Serve hot and enjoy a rich, creamy, and comforting pierogi casserole that’s guaranteed to be a family favorite!
Tips for the Best Pierogi Casserole with Kielbasa
How to Prevent a Soggy Casserole
- Don’t overcook the pierogies before baking – They should be slightly firm when added.
- Use a thick cheese sauce – A runny sauce can make the casserole watery.
- Let it rest for 5-10 minutes before serving – This helps the sauce set.
How to Get Extra Crispy Kielbasa
- Sear the kielbasa in a hot skillet before adding it to the casserole.
- Broil the casserole for 2-3 minutes at the end for a crispy top.
Best Cheese Options for a Flavorful Sauce
| Cheese Type | Flavor Profile |
|---|---|
| Cheddar | Sharp, tangy, and melts well |
| Mozzarella | Mild, creamy, and extra gooey |
| Gruyère | Nutty, rich, and adds depth |
| Parmesan | Salty, sharp, and enhances flavor |
Pair your pierogi casserole with these buttery Garlic Hawaiian Rolls for a perfect balance of soft and crispy textures.
Variations and Customizations
1. Spicy Pierogi Casserole
- Add ½ teaspoon red pepper flakes to the cheese sauce.
- Use jalapeño cheddar kielbasa for extra heat.
2. Vegetarian Pierogi Casserole
- Swap kielbasa for sautéed mushrooms, spinach, or roasted bell peppers.
- Use veggie pierogies instead of classic potato and cheese.
3. Loaded Pierogi Casserole
- Add extra crispy bacon and top with fried onions for indulgence.
4. Buffalo-Style Pierogi Casserole
- Mix ¼ cup buffalo sauce into the cheese sauce.
- Serve with a drizzle of ranch or blue cheese dressing.
A side of Honey Butter Skillet Corn adds a touch of sweetness that complements the savory flavors of the kielbasa and cheese.
Storage and Meal Prep Tips
Pierogi casserole with kielbasa is an excellent dish for meal prep, leftovers, and freezing. It stores well and can be easily reheated while keeping its creamy, cheesy texture. Below are the best ways to store, freeze, and reheat your casserole so that it remains delicious even after a few days.
Looking for another bold and flavorful meal? Try this Jalapeño Chicken Recipe for a spicy twist on a classic dish.
How to Store Leftovers
For the best results, store any leftover pierogi casserole with kielbasa properly to maintain its flavor and texture.
Refrigeration Instructions (For Short-Term Storage)
- Cool the casserole completely before storing. This prevents condensation from forming, which could make the dish soggy.
- Transfer to an airtight container or cover the baking dish tightly with plastic wrap or aluminum foil.
- Store in the refrigerator for up to 4 days.
Pro Tip: If you plan on eating leftovers in small portions, store individual servings in separate containers for easy reheating.
Freezing Instructions (For Long-Term Storage)
If you want to save your pierogi casserole for weeks or months, freezing is a great option!
How to Freeze the Whole Casserole
- Assemble the casserole but do not bake it if freezing for later.
- Wrap the entire dish tightly with plastic wrap, then cover with a layer of aluminum foil to prevent freezer burn.
- Label the container with the date and reheating instructions.
- Freeze for up to 3 months.
How to Freeze Leftover Portions
- Allow the casserole to cool completely after baking.
- Slice into individual portions and place them in freezer-safe containers or wrap them in plastic wrap and foil.
- Store in the freezer for up to 2 months.
Pro Tip: If using frozen pierogies, avoid freezing the casserole after baking, as it may alter the texture. Instead, freeze it before baking for the best results.
How to Reheat Pierogi Casserole Without Drying It Out
Proper reheating is key to keeping the pierogies soft and the cheese creamy. Here’s how to reheat your casserole for the best taste and texture.
Reheating in the Oven (Best Method for Whole Casserole)
- Preheat oven to 350°F (175°C).
- Place the casserole in an oven-safe dish, covering it with foil to prevent drying.
- Bake for 20-25 minutes if refrigerated, or 40-50 minutes if frozen.
- Remove the foil in the last 5 minutes for a crispy top.
Pro Tip: Add a splash of milk or broth before reheating to keep the casserole moist.
Reheating in the Microwave (Best for Individual Portions)
- Place a serving of the casserole on a microwave-safe plate.
- Add 1-2 teaspoons of milk or broth to prevent drying out.
- Cover with a damp paper towel to trap moisture.
- Heat on 50% power in 30-second intervals, stirring in between, until warmed through.
Avoid microwaving the entire casserole at once – it won’t heat evenly and may dry out the edges while the middle stays cold.
Reheating from Frozen (No Thawing Needed!)
- If baking directly from frozen, preheat oven to 350°F.
- Bake covered with foil for 40-50 minutes, then uncover for the last 5-10 minutes.
- If possible, thaw in the fridge overnight before reheating to reduce cooking time.
Pro Tip: If reheating individual frozen portions, microwave on low power (30-40%) for 3-4 minutes, then increase power to finish heating evenly.
For another comforting and satisfying meal-prep option, check out this Orange Chicken with Rice that’s packed with sweet and savory flavors.
Meal Prep Instructions
Want to make pierogi casserole ahead of time for easy weeknight meals? Here’s how:
Make-Ahead Method (Unbaked Casserole)
- Assemble the entire casserole in a baking dish but do not bake.
- Cover tightly with plastic wrap and aluminum foil.
- Refrigerate for up to 24 hours.
- When ready to eat, bake as directed but add an extra 5-10 minutes to the baking time since it’s starting from cold.
Pro Tip: Let the dish sit at room temperature for 20 minutes before baking to ensure even cooking.
Common Mistakes to Avoid When Storing & Reheating
- Don’t store the casserole while it’s still hot – This creates steam, leading to soggy pierogies. Always let it cool first.
- Avoid reheating at high temperatures – This can dry out the cheese sauce and overcook the pierogies.
- Don’t freeze the casserole after baking if using frozen pierogies – They can become mushy when thawed and reheated.
- Never microwave uncovered – This dries out the dish. Use a damp paper towel or a microwave cover to keep it moist.
FAQs About Pierogi Casserole with Kielbasa
1. Can I use fresh pierogies instead of frozen?
Yes! Just boil them for 1-2 minutes less than the package suggests before baking.
2. Can I make this casserole ahead of time?
Yes! Assemble everything up to a day in advance, store in the fridge, and bake when ready.
3. What’s the best kielbasa to use?
Look for Polish smoked kielbasa for the best authentic flavor.
Conclusion
Pierogi casserole with kielbasa is a creamy, cheesy, and satisfying dish that’s easy to prepare and packed with classic Eastern European flavors. Whether you serve it for a cozy family dinner, a holiday gathering, or meal prep, this dish is always a crowd-pleaser.
Try this recipe today and enjoy a hearty, comforting meal that’s perfect for any occasion!