Introduction
Garlic Hawaiian rolls are a delicious fusion of sweet and savory flavors, combining the pillowy softness of traditional Hawaiian rolls with the rich, aromatic taste of garlic butter. These rolls are perfect as a side dish, snack, or base for sliders, making them a versatile addition to any meal.
In this guide, you will learn everything you need to know about garlic Hawaiian rolls, from their origins and ingredients to step-by-step preparation. Whether you want to make them from scratch or enhance store-bought rolls, this article provides expert tips, serving suggestions, storage guidelines, and customization options to suit different dietary preferences.
What Are Garlic Hawaiian Rolls?
The History and Origin of Hawaiian Rolls
Hawaiian rolls have a unique place in American culinary history. They were first created by Robert Taira in the 1950s when he opened his bakery in Hilo, Hawaii. Inspired by Portuguese sweet bread, he developed a recipe that incorporated pineapple juice, giving the rolls their signature sweetness and fluffy texture. His bakery, King’s Hawaiian, eventually expanded to the mainland and made these rolls a household favorite.
Why Add Garlic to Hawaiian Rolls?
Traditional Hawaiian rolls are known for their subtle sweetness, but adding garlic introduces a rich, savory contrast that enhances their flavor. The combination of butter, garlic, and fresh herbs transforms these rolls into a gourmet treat that pairs well with various dishes. The garlic infusion also makes them ideal for those who love bold flavors and comforting baked goods.
Ingredients for Homemade Garlic Hawaiian Rolls
Essential Ingredients for the Dough
Making garlic Hawaiian rolls from scratch requires a few key ingredients to achieve the perfect balance of sweetness and softness:
- All-purpose or bread flour – Provides the necessary gluten structure for fluffy rolls.
- Active dry yeast or instant yeast – Helps the dough rise and creates a light, airy texture.
- Warm milk and pineapple juice – The combination of dairy and fruit juice adds moisture, richness, and a subtle sweetness.
- Granulated sugar – Enhances the sweetness and helps activate the yeast.
- Unsalted butter – Adds tenderness and a rich, buttery taste.
- Eggs – Provide structure and contribute to the soft texture.
- Salt – Balances flavors and enhances the overall taste.
- Minced garlic or garlic powder – The key ingredient for infusing a bold, garlicky flavor into the rolls.
Optional Additions for Extra Flavor
- Parmesan cheese – Adds a slightly salty and nutty taste to the garlic topping.
- Chopped parsley or chives – Enhances freshness and adds a pop of color.
- Honey – A touch of extra sweetness that complements the garlic butter.
How to Make Garlic Hawaiian Rolls from Scratch
Making homemade garlic Hawaiian rolls from scratch is a rewarding process that results in soft, buttery, and flavorful bread. The process involves preparing the dough, allowing it to rise, shaping the rolls, baking them to perfection, and finishing with a rich garlic butter glaze. Below is a detailed, step-by-step guide to achieving the best homemade garlic Hawaiian rolls.
Step 1: Preparing the Dough
The dough is the foundation of these rolls, and getting it right ensures a soft, fluffy texture.
1. Activating the Yeast
- In a large mixing bowl, combine ½ cup warm milk (about 110°F), ½ cup pineapple juice, ¼ cup granulated sugar, and 2 ¼ teaspoons (one packet) of active dry yeast.
- Stir gently and let the mixture sit for about 5 to 10 minutes until it becomes foamy. This indicates that the yeast is active.
- If the mixture does not foam up, the yeast might be expired, and you should start over with fresh yeast.
2. Mixing the Dough
- Once the yeast is activated, add:
- ¼ cup melted unsalted butter
- 2 beaten eggs
- 1 teaspoon salt
- Mix well until the ingredients are fully combined.
3. Adding the Flour
- Gradually add 3 to 3 ½ cups of all-purpose or bread flour, one cup at a time.
- Mix with a wooden spoon or a stand mixer fitted with a dough hook until the dough comes together.
- The dough should be slightly sticky but still manageable. If it is too sticky, add a little more flour, one tablespoon at a time.
4. Kneading the Dough
- If using a stand mixer, knead the dough on medium speed for 8 to 10 minutes until it becomes smooth and elastic.
- If kneading by hand, transfer the dough to a floured surface and knead for about 10 to 12 minutes until it is soft and slightly tacky but no longer sticks to your hands.
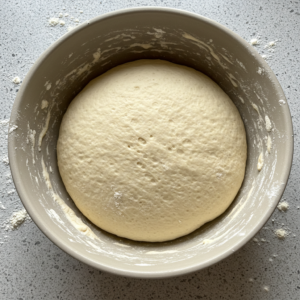
Step 2: First Rise (Proofing the Dough)
- Lightly grease a large bowl with butter or oil and place the kneaded dough inside.
- Cover the bowl with a clean kitchen towel or plastic wrap.
- Let the dough rise at room temperature for 1 ½ to 2 hours or until it has doubled in size.
- To check if the dough is ready, press two fingers gently into it—if the indentations remain, the dough is sufficiently proofed.
Troubleshooting:
- If the dough isn’t rising, place it in a warm environment (such as inside an oven with the light on or near a warm stovetop).
- Cold environments slow down yeast activity, so avoid placing the dough in a drafty area.
Step 3: Shaping and Preparing the Rolls for Baking

1. Dividing the Dough
- Once the dough has risen, punch it down gently to release excess air.
- Transfer it to a floured surface and divide it into 12 to 16 equal portions, depending on the desired roll size.
2. Shaping the Rolls
- Take each dough piece and shape it into a smooth ball by tucking the edges underneath.
- Roll each ball between your palms to create a uniform shape.
- Arrange the dough balls in a greased 9×13-inch baking dish or a large round cake pan.
3. Second Rise
- Cover the shaped rolls with a clean kitchen towel and let them rise again for 30 to 45 minutes, or until they are noticeably puffy.
- This second rise ensures the rolls remain soft and fluffy after baking.
Step 4: Baking the Garlic Hawaiian Rolls
1. Preheating the Oven
- Preheat your oven to 350°F (175°C) during the last 10 minutes of the second rise.
- Ensure the oven rack is in the center position for even baking.
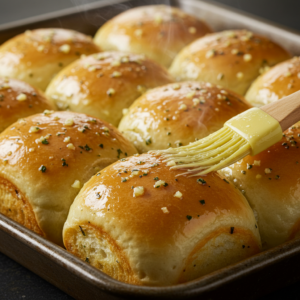
2. Brushing the Rolls Before Baking
- For a glossy finish, brush the rolls lightly with an egg wash (1 egg beaten with 1 tablespoon of water or milk).
- This step is optional but helps create a golden, slightly shiny crust.
3. Baking the Rolls
- Bake the rolls for 20 to 25 minutes, or until the tops are golden brown.
- Halfway through baking, rotate the pan to ensure even browning.
Baking Tips:
- If the tops are browning too quickly, cover the rolls loosely with foil to prevent over-browning while the inside continues to bake.
- The rolls are done when they sound hollow when tapped on the bottom or when an instant-read thermometer inserted into the center reads 190°F (88°C).
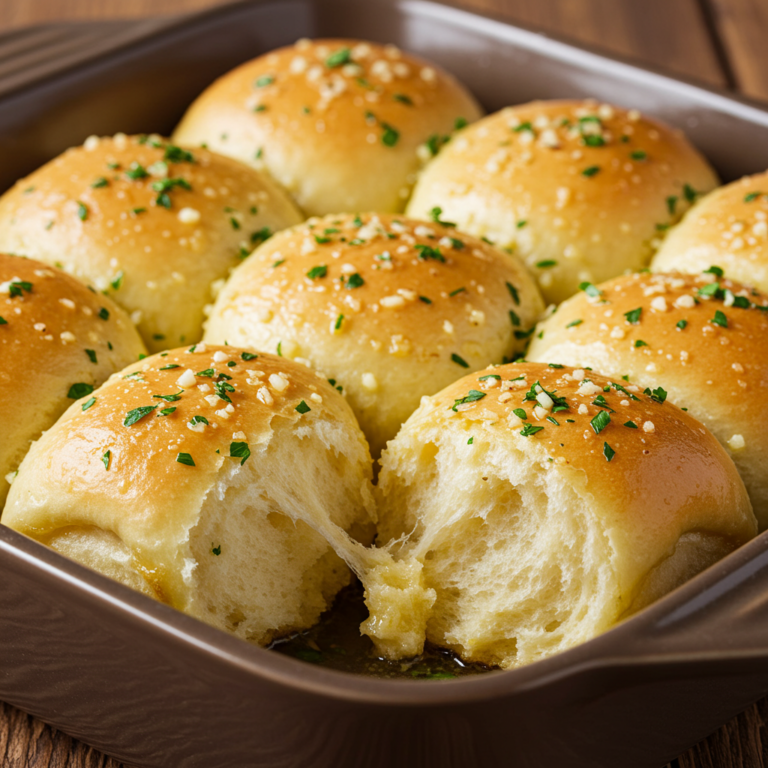
Step 5: Making and Adding the Garlic Butter Glaze
Once the rolls come out of the oven, it’s time to enhance them with a rich garlic butter topping.
1. Preparing the Garlic Butter
- In a small saucepan over low heat, melt ¼ cup unsalted butter.
- Add 2 to 3 cloves of minced garlic and cook for about 1 minute, just until fragrant.
- Stir in 1 tablespoon of finely chopped fresh parsley and a pinch of salt.
2. Brushing the Rolls
- While the rolls are still warm, brush the garlic butter generously over the tops.
- The heat from the rolls will allow the butter to soak in, creating a rich, buttery flavor.
3. Serving the Rolls
- Allow the rolls to cool slightly before serving.
- They can be enjoyed warm or at room temperature.
Variations on the Garlic Butter Topping
The garlic butter glaze can be customized in various ways for extra flavor.
1. Cheesy Garlic Rolls
- Mix ¼ cup grated Parmesan or shredded mozzarella into the melted butter before brushing it on the rolls.
- Alternatively, sprinkle the cheese on top of the rolls and return them to the oven for 2 to 3 minutes until melted.
2. Spicy Garlic Rolls
- Add ½ teaspoon of crushed red pepper flakes to the butter for a spicy kick.
- Mix in a dash of smoked paprika for a smoky flavor.
3. Herb-Infused Rolls
- Add a combination of fresh rosemary, thyme, and oregano for a more aromatic taste.
- Use garlic-infused olive oil instead of butter for a different flavor profile.
For an extra cheesy twist, turn these rolls into a garlic bread variation similar to this pizza oven garlic cheese bread.
What Makes These Rolls Unique?
- Balanced Flavor – The combination of sweet Hawaiian roll dough with buttery garlic glaze creates a perfect contrast of flavors.
- Fluffy Texture – The use of yeast, eggs, and pineapple juice contributes to a soft and airy crumb.
- Versatile Pairing – These rolls complement a variety of dishes, from pasta and soups to barbecue and sliders.
- Customizable Additions – The recipe can be modified with different herbs, cheeses, and spices to create unique variations.
How to Enhance Store-Bought Hawaiian Rolls
Quick Garlic Butter Infusion
If you’re short on time, you can easily elevate store-bought Hawaiian rolls by adding a homemade garlic butter topping:
- Preheat your oven to 350°F.
- Melt butter and mix with minced garlic, salt, and finely chopped parsley.
- Slice the rolls in half horizontally and brush the butter mixture generously over the top.
- Place the rolls on a baking sheet and bake for 5 to 7 minutes until warm and fragrant.
Cheesy Garlic Hawaiian Rolls
For an indulgent variation, add shredded mozzarella or Parmesan cheese before baking. Simply sprinkle the cheese over the buttered rolls and bake until melted and slightly golden.
Best Ways to Serve Garlic Hawaiian Rolls
Pairing with Meals
Garlic Hawaiian rolls complement a variety of dishes, including:
- Pasta dishes such as spaghetti, fettuccine alfredo, or lasagna.
- Hearty soups and stews like chicken noodle soup, beef stew, or clam chowder.
- Barbecue favorites such as smoked brisket, pulled pork, and grilled chicken.
Transforming Rolls into Sliders
- Use garlic Hawaiian rolls as a base for pulled pork sliders with barbecue sauce.
- Make mini chicken Parmesan sandwiches with breaded chicken, marinara sauce, and melted mozzarella.
- Create turkey and cheese sliders with honey mustard dressing for a sweet and savory balance.
For a sweet and savory side dish, try pairing these rolls with honey butter skillet corn to complement the rich garlic flavors.
Pro Tips for Perfect Garlic Hawaiian Rolls
Getting the Best Texture
- Use bread flour instead of all-purpose flour for a chewier texture.
- Allow the dough to rise fully before baking for light and airy rolls.
- Brush butter over the rolls while they’re still hot to keep them soft.
Customizing the Garlic Flavor
- Roast the garlic before adding it to the butter for a deeper, caramelized taste.
- Use garlic-infused olive oil instead of fresh garlic for a milder flavor.
- Add red pepper flakes for a spicy kick.
Storage and Reheating Instructions
Proper Storage Methods
- Store at room temperature in an airtight container for up to three days.
- Refrigerate for up to one week in a sealed bag.
- Freeze for up to three months in a freezer-safe bag.
How to Reheat Garlic Hawaiian Rolls
- Oven method – Wrap the rolls in foil and bake at 300°F for 5-10 minutes.
- Microwave method – Wrap the rolls in a damp paper towel and heat for 15-20 seconds.
If you have leftover rolls, consider repurposing them into Hawaiian roll French toast for a delicious breakfast option.
FAQs About Garlic Hawaiian Rolls
Can I make the dough ahead of time?
Yes! The dough can be prepared the night before and left to rise in the refrigerator overnight.
How can I make gluten-free garlic Hawaiian rolls?
Use a gluten-free flour blend with xanthan gum to maintain structure and texture.
What can I substitute for pineapple juice?
You can use orange juice or apple juice, but pineapple juice provides the best sweetness.
Conclusion
Garlic Hawaiian rolls offer the perfect balance of sweetness and savory richness. Whether made from scratch or enhanced from store-bought rolls, they can be customized in many ways to suit different preferences. These rolls make a fantastic addition to any meal, whether served alongside a main dish or as the base for sliders. Try out different variations, experiment with toppings, and enjoy this irresistible treat!
Use these rolls to make fun mini sandwiches or sliders, similar to these cheeseburger bombs for a creative meal.