Introduction
Butterfinger balls are a delicious no-bake dessert that combines creamy peanut butter, crushed Butterfinger candy bars, and chocolate for an irresistible bite-sized treat. These easy-to-make candies are perfect for holidays, parties, or whenever you crave a sweet and crunchy indulgence.
In this guide, you’ll learn how to make Butterfinger balls from scratch, including ingredient substitutions, step-by-step instructions, storage tips, and creative variations to customize the recipe to your liking.
What Are Butterfinger Balls?
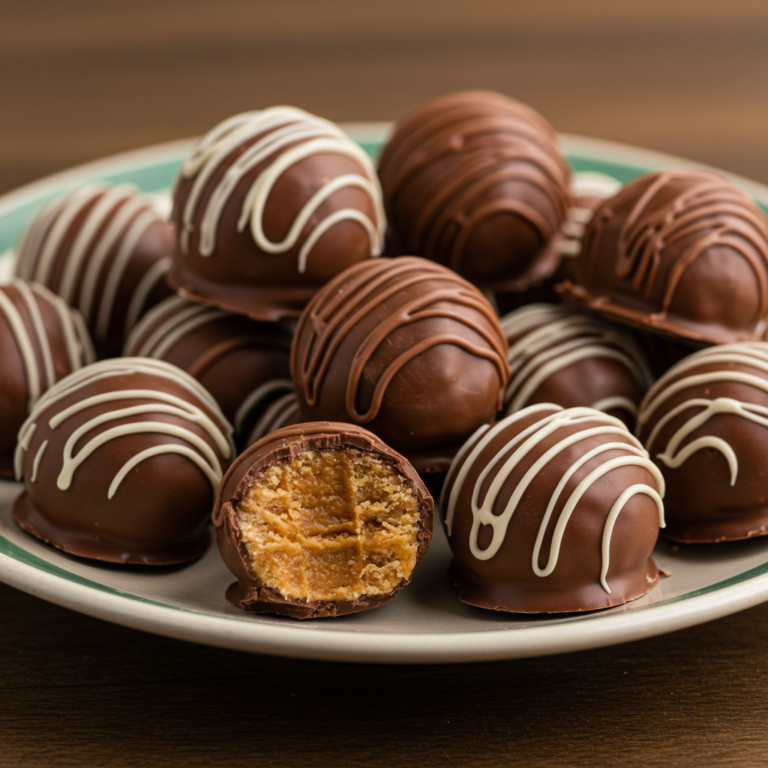
Butterfinger balls are a no-bake dessert made from a rich combination of peanut butter, crushed Butterfinger candy bars, powdered sugar, and chocolate. These bite-sized treats are easy to prepare, require minimal ingredients, and offer the perfect balance of creamy, crunchy, and chocolatey flavors. Whether you’re making them for the holidays, special occasions, or just as a quick sweet snack, Butterfinger balls are always a hit.
The Inspiration Behind Butterfinger Balls
Butterfinger balls are inspired by classic peanut butter truffles and Buckeye candy, a traditional Midwestern treat featuring a peanut butter filling dipped in chocolate. However, what sets Butterfinger balls apart is the crushed Butterfinger candy bars, which add a unique crispy, caramelized peanut flavor that elevates the texture and taste.
These candy bars are known for their light, flaky peanut butter core covered in a crisp chocolate coating, making them the perfect ingredient to mix into a peanut butter base. By combining them with peanut butter and chocolate, you get a dessert that captures all the flavors of a Butterfinger candy bar in a homemade truffle-like form.
Why You’ll Love This Recipe
Butterfinger balls are one of the easiest homemade treats to make, and here’s why they’re so popular:
- No Baking Required – Perfect for when you need a quick and easy dessert without turning on the oven.
- Minimal Ingredients – Requires only a handful of pantry staples.
- Customizable – Can be adapted with different coatings, mix-ins, or drizzles.
- Perfect for Any Occasion – Great for holidays, birthdays, game days, or potlucks.
- Kid-Friendly & Fun to Make – A great recipe to involve kids in the kitchen.
- Make-Ahead Friendly – Stores well in the fridge or freezer for easy snacking.
The Perfect Texture: Creamy, Crunchy, and Chocolatey
Butterfinger balls stand out because of their unique texture combination:
- Soft & Creamy: The peanut butter and powdered sugar mixture creates a smooth, truffle-like center.
- Crunchy: The crushed Butterfinger pieces add a crispy crunch in every bite.
- Chocolatey: The rich chocolate coating provides a smooth, slightly crisp outer shell.
This combination makes every bite delightfully creamy, with the perfect amount of crunch and sweetness.
What Makes Butterfinger Balls Different from Other Peanut Butter Treats?
Although they may seem similar to traditional Buckeyes or peanut butter truffles, Butterfinger balls have a few key differences:
| Feature | Buckeyes | Peanut Butter Truffles | Butterfinger Balls |
|---|---|---|---|
| Main Flavor | Peanut butter | Peanut butter | Peanut butter + Butterfinger candy |
| Texture | Smooth and creamy | Soft and creamy | Creamy with a crispy crunch |
| Chocolate Coating | Partially dipped | Fully dipped | Fully dipped |
| Additional Mix-ins | Usually none | Sometimes uses nuts or cookies | Crushed Butterfinger pieces |
Butterfinger balls take the best elements of each treat and add an extra layer of crunch and flavor, making them a standout dessert.
The Best Occasions to Serve Butterfinger Balls
These delicious treats are incredibly versatile and can be made for a variety of events:
- Holiday Cookie Trays – Perfect for Christmas, Thanksgiving, and Easter.
- Game Day Snacks – A great finger food option for football parties.
- Birthday Parties – A kid-friendly treat that’s always a hit.
- Gift Boxes – Homemade Butterfinger balls make excellent edible gifts.
- Potlucks & Bake Sales – Easy to transport and share with a crowd.
No matter the occasion, Butterfinger balls are a simple yet indulgent treat that will impress anyone who tries them.
For a balanced sweet and savory experience, enjoy these Butterfinger balls as a dessert after a flavorful meal like this Street Corn Chicken Rice Bowl.
Ingredients for Butterfinger Balls
Essential Ingredients
- 1 ½ cups creamy peanut butter – Provides the base for the filling.
- 1 cup powdered sugar – Sweetens the mixture and helps firm up the texture.
- 1 teaspoon vanilla extract – Enhances the flavor.
- 1 ½ cups crushed Butterfinger candy bars – Adds crunch and signature Butterfinger flavor.
- 2 cups chocolate chips (semi-sweet or milk chocolate) – Used for coating the balls.
- 1 tablespoon coconut oil (or vegetable shortening) – Helps create a smooth chocolate coating.
Optional Additions
- ¼ teaspoon sea salt – Balances sweetness and enhances flavor.
- White chocolate drizzle – For a decorative finish.
- Chopped peanuts – Adds extra crunch on top.
Part 3: How to Make Butterfinger Balls
Making Butterfinger balls is a simple, no-bake process that requires just a few key steps: mixing the filling, shaping the balls, coating them in chocolate, and letting them set. Below is a detailed step-by-step guide to ensure your Butterfinger balls turn out perfectly every time.
1 Step: Preparing the Peanut Butter Mixture
- Gather the ingredients – Ensure you have all your ingredients measured and ready.
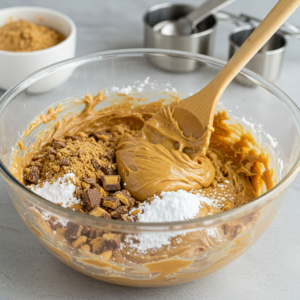
- Mix peanut butter, powdered sugar, and vanilla – In a large mixing bowl, stir together:
- 1 ½ cups creamy peanut butter
- 1 cup powdered sugar
- 1 teaspoon vanilla extract
- Incorporate the crushed Butterfinger – Fold in 1 ½ cups crushed Butterfinger candy bars, making sure it’s evenly distributed throughout the mixture.
- Check the consistency – The dough should be thick and slightly sticky but firm enough to roll into balls. If it’s too soft, refrigerate for 15-20 minutes before shaping.
2 Step: Shaping the Butterfinger Balls
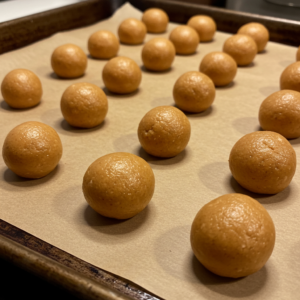
- Line a baking sheet – Place a piece of parchment paper or wax paper on a baking sheet to prevent sticking.
- Scoop and roll – Using a small cookie scoop or a tablespoon, portion out the mixture and roll into smooth balls.
- Size matters – Aim for 1-inch balls for the perfect bite-sized treat.
- Arrange and freeze – Place the rolled balls on the lined baking sheet and freeze for 30 minutes to firm up before dipping in chocolate.
3 Step: Melting the Chocolate
- Choose your chocolate – You can use milk, semi-sweet, or dark chocolate chips, depending on your preference.
- Combine with coconut oil – Adding 1 tablespoon of coconut oil (or vegetable shortening) helps create a smooth, glossy coating.
- Melt the chocolate –
- Microwave method: Heat in 30-second intervals, stirring after each until fully melted and smooth.
- Double boiler method: Place a heatproof bowl over a pot of simmering water, stirring constantly until melted.
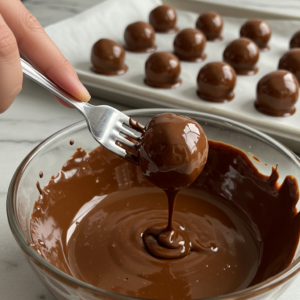
4 Step: Coating the Butterfinger Balls
- Dip each ball into melted chocolate – Use a fork or a toothpick to submerge the ball, ensuring it’s fully coated.
- Tap off excess chocolate – Gently tap the fork against the side of the bowl to remove excess chocolate before placing the coated ball back on the parchment paper.
- Decorate if desired – Before the chocolate hardens, sprinkle extra crushed Butterfinger pieces on top or drizzle with melted white chocolate for a decorative finish.
5 Step: Let the Chocolate Set
- Chill to harden the coating – Refrigerate the dipped Butterfinger balls for 15-20 minutes until the chocolate sets.
- Store properly – Transfer to an airtight container and keep in the fridge or freezer for longer shelf life.
If you’re looking for a sophisticated dessert pairing, try these Butterfinger balls alongside a rich and creamy Creme Brulee Cheesecake.
Tips for the Best Butterfinger Balls
Achieving the perfect Butterfinger balls requires some key techniques. Here are the best tips to ensure success:
How to Achieve the Perfect Texture
- Use room-temperature peanut butter – It blends more easily with the powdered sugar and Butterfinger pieces.
- Crush Butterfinger bars finely – Large chunks can make rolling difficult, so use a food processor or crush them with a rolling pin.
- Chill the dough before rolling – If the mixture is too sticky, refrigerate for 15-20 minutes before shaping.
- Freeze before dipping – Chilling the balls helps them hold their shape when dipped into warm chocolate.
Keep the Chocolate Smooth and Even
- Use high-quality chocolate – Cheap chocolate chips may not melt as smoothly.
- Add coconut oil or shortening – This makes the melted chocolate silkier and prevents thick clumping.
- Stir frequently – Whether microwaving or using a double boiler, stir regularly to prevent burning.
- Avoid overheating – Overheated chocolate becomes thick and difficult to work with. Melt gradually.
How to Make the Coating Extra Crunchy
- Double-dip method – For a thicker chocolate shell, dip the Butterfinger balls a second time after the first layer sets.
- Sprinkle extra Butterfinger pieces – For an extra crunch, add crushed candy on top before the chocolate sets.
- Roll in crushed graham crackers or chopped peanuts – Adds texture and complements the flavors.
Variations and Customizations
1. White Chocolate Butterfinger Balls
- Use white chocolate chips instead of milk or dark chocolate.
- Sprinkle crushed Butterfinger pieces on top for contrast.
2. Nut-Free Version
- Substitute peanut butter with sunflower seed butter or cookie butter.
- Use nut-free chocolate for coating.
3. Butterfinger Truffles
- Add 4 ounces of softened cream cheese to the peanut butter mixture for a creamier texture.
4. Crunchier Butterfinger Balls
- Mix in ¼ cup of rice cereal to add extra crunch to the filling.
5. Holiday Butterfinger Balls
- Roll in festive sprinkles after dipping for a holiday-themed treat.
- Use colored white chocolate for seasonal variations.
For a chocolatey twist, you can pair Butterfinger balls with these chocolate fudge cookies to create a delicious dessert platter.
Storage and Freezing Tips
Proper storage ensures that your Butterfinger balls stay fresh and delicious for as long as possible. Whether you’re making them ahead of time or saving leftovers, follow these guidelines for the best results.
How to Store Butterfinger Balls
Short-Term Storage (Room Temperature & Refrigerator)
- Room temperature: If kept in a cool, dry place, Butterfinger balls can last 3-4 days in an airtight container.
- Refrigerator: Store in a sealed container for up to 2 weeks to maintain freshness.
- Layer with parchment paper – If stacking in a container, place parchment paper between layers to prevent sticking.
How to Freeze Butterfinger Balls
Freezing Butterfinger balls is a great way to extend their shelf life and have a stash ready for later enjoyment.
Freezing Baked Butterfinger Balls
- Flash freeze – Arrange the dipped Butterfinger balls on a baking sheet and freeze for 1 hour until solid.
- Transfer to a freezer bag – Place the frozen balls into a resealable freezer-safe bag or airtight container.
- Label and date – Write the date on the bag to keep track of freshness.
- Store for up to 3 months – These freeze well and maintain their texture.
Thawing Frozen Butterfinger Balls
- At room temperature – Let the frozen balls sit out for 10-15 minutes before eating.
- In the refrigerator – Transfer to the fridge for 30-60 minutes for gradual thawing.
How to Freeze Butterfinger Ball Dough
If you want to prepare the dough ahead of time and freeze it for later use, follow these steps:
- Make the dough and roll into balls – Do not coat in chocolate yet.
- Place on a baking sheet and freeze – Let the dough balls freeze solid for about 1 hour.
- Store in a freezer-safe bag – Remove as much air as possible before sealing.
- Freeze for up to 3 months – The dough remains fresh and easy to dip in chocolate when needed.
- When ready to use – Thaw the frozen dough balls in the refrigerator before dipping in melted chocolate.
Best Storage Containers for Butterfinger Balls
- Short-term storage: Airtight containers or resealable plastic bags.
- Freezer storage: Freezer-safe bags, vacuum-sealed pouches, or rigid plastic containers.
These Butterfinger balls store well with other holiday treats like Eggnog Snickerdoodle Cookies, making them perfect for holiday gift boxes.
FAQs About Butterfinger Balls
1. Can I use crunchy peanut butter?
Yes, but the texture will be chunkier. If using, reduce crushed Butterfinger slightly.
2. Can I make these ahead of time?
Absolutely! These store well in the fridge or freezer, making them a great make-ahead dessert.
3. Why is my chocolate coating clumpy?
Ensure the chocolate is fully melted and stir in coconut oil or shortening for a smoother consistency.
4. Can I use almond butter instead?
Yes, but the flavor will be different. Stick with creamy varieties for the best texture.
Conclusion
Butterfinger balls are an easy, no-bake dessert with the perfect combination of creamy peanut butter, crunchy Butterfinger candy, and smooth chocolate coating. Whether you enjoy them plain or customize them with different toppings and coatings, these treats are sure to become a favorite.
Now that you know how to make them, try experimenting with different flavors and enjoy these bite-sized delights at your next gathering!