Introduction :
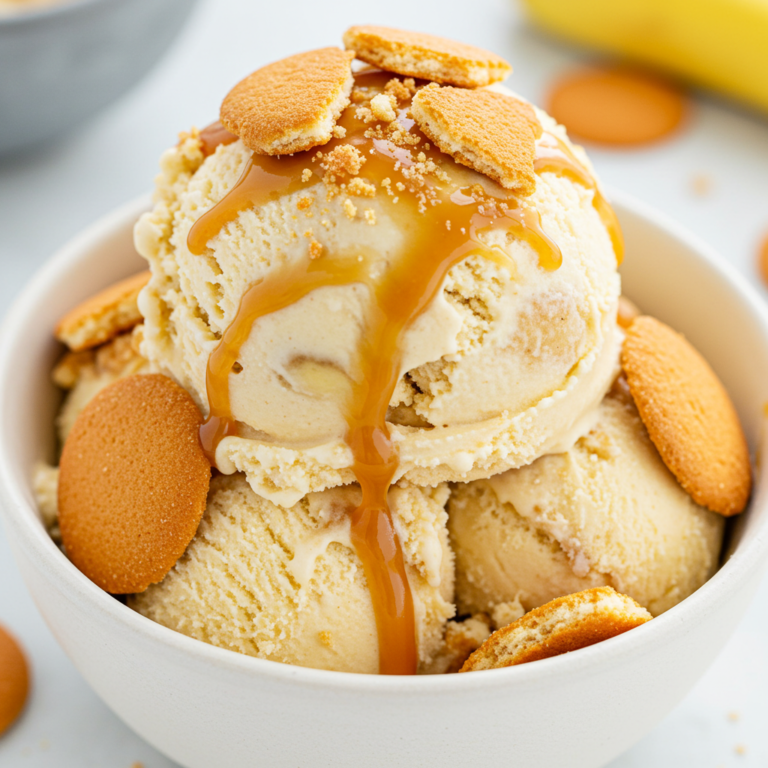
If you love the classic Southern banana pudding, you’ll adore this banana pudding ice cream! This creamy, dreamy dessert combines the rich flavor of ripe bananas, velvety vanilla pudding, and crunchy vanilla wafers, all blended into a luscious ice cream base.
Whether you’re making it with an ice cream maker or using a no-churn method, this easy recipe delivers a nostalgic, homemade treat that’s perfect for warm weather—or any time you crave something sweet and comforting.
Looking for more ways to use ripe bananas? You’ll love these moist and fluffy Pumpkin Banana Muffins—perfect for breakfast or dessert.
Why You’ll Love This Banana Pudding Ice Cream
- Ultra-Creamy Texture: A rich custard base makes it smooth and velvety.
- Authentic Banana Flavor: Made with real bananas—no artificial banana flavoring!
- Crunchy, Sweet Add-Ins: Vanilla wafers add the perfect texture.
- Customizable: Add caramel, chocolate chips, or extra banana slices.
- Easy to Make: Includes churn and no-churn options.
Ingredients for Banana Pudding Ice Cream
To achieve the perfect banana pudding ice cream flavor, you’ll need these simple ingredients:
For the Ice Cream Base:
- 2 large ripe bananas, mashed (the riper, the better!)
- 2 cups heavy cream
- 1 cup whole milk
- ¾ cup granulated sugar
- 3 large egg yolks (for a custard base)
- 1 tbsp vanilla extract
- ½ tsp salt
For the Banana Pudding Flavor:
- 1 cup prepared vanilla pudding (store-bought or homemade)
- 1 cup vanilla wafer cookies, crushed
- ½ cup sweetened condensed milk (for extra creaminess)
Pro Tip: Use overripe bananas for the best flavor—they should be deep yellow with brown spots.
How to Make Banana Pudding Ice Cream
Option 1: Churn Method (Best for Ultra-Creamy Texture)
1-Prepare the Ice Cream Base:
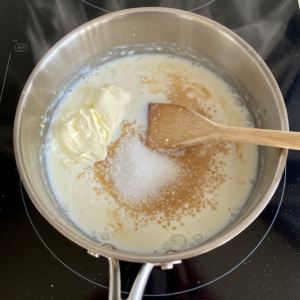
- In a saucepan, heat milk, heavy cream, and sugar over medium heat until warm (but not boiling).
- In a separate bowl, whisk egg yolks. Slowly pour 1/2 cup of the warm milk mixture into the yolks while whisking (this prevents curdling).
- Pour the egg mixture back into the saucepan and cook over low heat, stirring constantly until it thickens (about 5-7 minutes).
2-Add the Banana Flavor:
- Remove from heat and stir in mashed bananas, vanilla extract, salt, and sweetened condensed milk.
- Strain through a fine-mesh sieve (optional, but makes it extra smooth).
3-Chill the Mixture:
- Cover and chill in the fridge for at least 4 hours (or overnight). The colder, the better!
4-Churn the Ice Cream:
- Pour the chilled mixture into your ice cream maker and churn according to the manufacturer’s instructions (about 20-25 minutes).
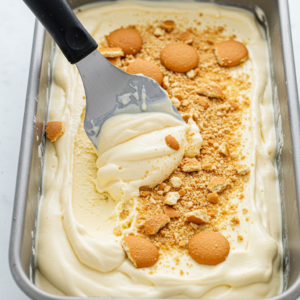
5-Add Mix-Ins:
- In the last 5 minutes of churning, add vanilla pudding and crushed vanilla wafers.
6-Freeze Until Firm:
- Transfer to a container and freeze for 2-4 hours for a firmer texture.
Pro Tip: Let the ice cream sit at room temperature for 5 minutes before scooping for the best texture.
Option 2: No-Churn Banana Pudding Ice Cream (Easier & Faster!)
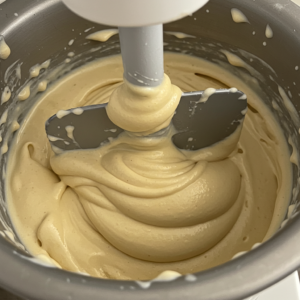
1-Whip the Cream:
- In a large bowl, beat heavy cream with an electric mixer until stiff peaks form.
2-Fold in Other Ingredients:
- Gently fold in sweetened condensed milk, mashed bananas, vanilla extract, and salt.
3-Add Mix-Ins:
- Stir in vanilla pudding and crushed vanilla wafers.
4-Freeze:
- Transfer to a loaf pan or airtight container and freeze for 6 hours or overnight.
No Ice Cream Maker? No Problem! This no-churn method gives a rich, creamy texture without extra equipment.
Serving & Topping Ideas
Classic Style: Serve in a bowl with extra vanilla wafers and sliced bananas.
Banana Pudding Sundae: Drizzle with caramel sauce and top with whipped cream.
Banana Ice Cream Sandwiches: Scoop between two soft cookies for a delicious twist.
Pair with Desserts: Serve alongside pound cake, waffles, or brownies for an indulgent treat.
Pro Tip: Store leftovers in an airtight container to prevent freezer burn. Enjoy within 2 weeks for the best flavor.
For a quick, colorful dessert, this creamy Fruit Salad with Cool Whip makes a perfect companion to a scoop of banana pudding ice cream.
Common Mistakes to Avoid
1. Using Unripe Bananas
- Ripe bananas add natural sweetness and deeper flavor. If your bananas aren’t ripe enough, the ice cream may taste bland.
2. Skipping the Chill Time
- The ice cream base needs to be fully chilled before churning for a smooth consistency.
3. Adding Wafers Too Early
- If added too soon, the cookies will become too soft and mushy. Add them at the last 5 minutes of churning for the best texture.
4. Over-Churning the Ice Cream
- Stop churning once it reaches a soft-serve consistency. Over-churning can make it grainy.
Delicious Variations and Dietary Options
Want to put a twist on your classic banana pudding ice cream? Here are some creative variations and substitutions to suit different dietary needs and preferences.
Flavor Variations
Chocolate Banana Pudding Ice Cream
- Add ½ cup of melted dark chocolate to the ice cream base.
- Sprinkle chocolate chips or cocoa powder for an extra chocolatey bite.
Peanut Butter Banana Pudding Ice Cream
- Swirl in ¼ cup of peanut butter before freezing.
- Top with crushed peanut butter cookies instead of vanilla wafers.
Caramel Banana Pudding Ice Cream
- Drizzle salted caramel sauce into the ice cream during the last few minutes of churning.
- Add toffee bits for a crunchy texture.
Coconut Banana Pudding Ice Cream
- Replace heavy cream with coconut cream for a tropical twist.
- Add toasted coconut flakes and a splash of coconut extract.
Strawberry Banana Pudding Ice Cream
- Mix in ½ cup of diced fresh strawberries or strawberry jam for a fruity burst.
- Serve with a strawberry drizzle on top.
Sandwich your ice cream between two Carrot Cake Cookies for a decadent homemade ice cream sandwich.
Dietary Options
Dairy-Free & Vegan Banana Pudding Ice Cream
- Replace heavy cream with full-fat coconut milk.
- Use almond milk or oat milk instead of whole milk.
- Swap sweetened condensed milk for coconut condensed milk.
- Use dairy-free vanilla pudding and gluten-free vanilla wafers.
Gluten-Free Banana Pudding Ice Cream
- Use certified gluten-free vanilla wafers or swap them for gluten-free shortbread cookies.
- Double-check all ingredients (especially pudding mix) for hidden gluten.
Low-Sugar/Keto-Friendly Banana Pudding Ice Cream
- Replace sugar with monk fruit sweetener or erythritol.
- Use sugar-free vanilla pudding and low-carb vanilla wafers.
- Skip the bananas and use banana extract to keep carbs low.
Pro Tip: Adjust sweeteners and mix-ins based on your dietary needs while keeping the creamy consistency intact.
Tips for Perfect Homemade Ice Cream
1. Use Ripe Bananas for the Best Flavor
- The best bananas for ice cream are deep yellow with brown spots.
- Overripe bananas add natural sweetness and a stronger banana flavor.
2. Chill the Ice Cream Base Before Churning
- A cold base churns into smoother ice cream.
- Chill your mixture for at least 4 hours (or overnight) before putting it in the ice cream maker.
3. Prevent Ice Crystals for a Creamy Texture
- Use sweetened condensed milk to keep ice cream soft.
- Press plastic wrap directly onto the surface before freezing to reduce air exposure.
4. Add Mix-Ins at the Right Time
- Stir in vanilla wafers and pudding during the last 5 minutes of churning.
- This prevents the cookies from becoming too soggy.
5. Store Properly for the Best Freshness
- Store in an airtight container in the coldest part of your freezer.
- Eat within 1-2 weeks for the best texture and flavor.
FAQs About Banana Pudding Ice Cream
1. What makes banana pudding ice cream different from regular banana ice cream?
Banana pudding ice cream combines the flavors of classic Southern banana pudding—it has crushed vanilla wafers, vanilla pudding, and a rich custard base. Regular banana ice cream typically contains just bananas, milk, and sugar.
2. Do I need an ice cream maker to make this?
No! You can use a no-churn method by whipping heavy cream and folding in the other ingredients before freezing. The churn method produces a smoother, creamier texture, but no-churn ice cream is still delicious and easy to make.
3. Can I use frozen bananas instead of fresh?
Yes! If using frozen bananas, thaw them before mashing. However, frozen bananas tend to release extra moisture, which can make the ice cream slightly icy.
Pro Tip: If using frozen bananas, reduce the amount of milk slightly to balance the consistency.
4. Why does my homemade ice cream turn out too hard?
- Homemade ice cream can freeze harder than store-bought versions because it lacks commercial stabilizers. To keep it soft:
- Use sweetened condensed milk or corn syrup to lower the freezing point.
- Let it sit at room temperature for 5 minutes before scooping.
- Store in a shallow container to help it freeze evenly.
5. Can I substitute vanilla wafers with another cookie?
Absolutely! Try these alternatives:
- Shortbread cookies – For a buttery flavor.
- Graham crackers – Adds a slightly different crunch.
- Nilla Wafers (gluten-free version) – For a gluten-free option.
6. How long does homemade banana pudding ice cream last?
- For best flavor and texture, eat it within 1-2 weeks.
- After 2-3 weeks, ice crystals may form, affecting creaminess.
7. Can I add extra bananas for a stronger banana flavor?
Yes, but be cautious—too much banana can make the texture icy. Instead, use banana extract to enhance the flavor without affecting texture.
Pro Tip: Stick to 2-3 bananas for the perfect balance of flavor and creaminess.
8. Can I make this ice cream without eggs?
Yes! You can skip the egg yolks and use sweetened condensed milk or extra vanilla pudding to maintain the creamy texture.
9. How do I prevent the vanilla wafers from getting soggy?
- Add crushed vanilla wafers at the end of churning, not before.
- Store extra wafers separately and sprinkle them on top when serving.
10. Can I make this ice cream in advance for a party?
Yes! Make it 1-2 days in advance for the best flavor. Serve in pre-scooped bowls or set up a banana pudding sundae bar with toppings like:
Sliced bananas
Chocolate drizzle
Extra crushed cookies
Whipped cream
Final Thoughts
Banana pudding ice cream is the perfect homemade treat, blending the rich, nostalgic flavors of banana pudding with the creamy indulgence of ice cream. Whether you’re making it churned or no-churn, with dairy or dairy-free options, these tips and variations will help you create the perfect batch every time.
Now, grab your ripe bananas, whip up a batch, and enjoy a cool, creamy, and absolutely irresistible banana pudding ice cream!